Windows 10- An Introduction: Windows 10 is the latest Client based Operating System from Microsoft Corporation, based on Windows NT family. The first consumer release of Windows 10 OS was 29th July, 2015. The latest build or release is 1607 (10.0.14393.726), February 8, 2017. Windows 10 introduces "
universal apps" where these apps can be designed to run across multiple Microsoft product families with nearly identical code—including
PCs,
tablets,
smartphones,
embedded systems,
Xbox One,
Surface Hub and
Windows Holographic. Additionally, Windows user interface was revised to handle transitions between a mouse-oriented interface and a touchscreen-optimized interface based on available input devices—particularly on
2-in-1 PCs; both interfaces include an updated
Start menu which incorporates elements of Windows 7's traditional Start menu with the tiles of Windows 8. The first release of Windows 10 also introduces a
virtual desktop system, a window and desktop management feature called Task View, the
Microsoft Edge web browser, support for
fingerprint and
face recognition login, new security features for enterprise environments, and
DirectX 12 and
WDDM 2.0 to improve the operating system's graphics capabilities for games.
1. Open VMware Workstation 12 Pro and click on 'Create a New Virtual Machine'.
 |
| Click to zoom this Image |
2. Once you click on 'Create a New Virtual Machine', New Virtual Machine Wizard will pop up where it will ask you to select the type of configuration for Windows 10. I chose
Typical (recommended).
 |
| Click to zoom this Image |
3. On the next window, it will ask you how to install Windows 10 on your virtual machine. There are three options. (i) If your Windows 10 comes with DVD, then insert the disk on your computer and select
Installer Disc. (ii) If you have downloaded Windows 10, as iso, on your hard drive then choose
Installer disc image file (iso) to locate iso file. (iii) Else, choose
I will choose to install operating system later after you configure your virtual machine.
 |
| Click to zoom this Image |
4. Choose
Microsoft Windows 10 as a Guest Operating System. Then select type of version you have for Windows 10. For example: if you have Windows 10 64 bit as DVD or iso, then select Windows 10 x64 or else simply choose Windows 10.
 |
| Click to zoom this Image |
5. Now give the name of Guest Operating as per your choice. As I am installing Windows 10 on virtual machine, so I gave the same name. Now choose the location, where you want to install Windows 10. I created Windows 10 folder in D drive, however you can leave the default location as it is.
 |
| Click to zoom this Image |
6.
Virtual machine's virtual disk (.vmdk) file has it own compress format which is much higher than Hard Disk size. Depending on the size of your Hard Disk partition please mention virtual disk size. I created D drive partition of size 100 GB, so I mentioned 500 GB virtual drive for my Windows 10 installation. After installation, it occupied a space of 21.6 GB on my D drive (this size may vary depending on the plat form, x64 bit or x32 bit to chose to install Windows 10 on your virtual machine).
 |
| Click to zoom this Image |
7. This is the configuring setting window where you can see the default setting of virtual machine. However, you can customize this setting by clicking on
Customize Hardware.
 |
| Click to zoom this Image |
8. Depending on the Hardware Configuration of your physical system, i.e PC, you can customize this page.
 |
| Click to zoom this Image |
9. Once you are done, please click on
Finish button.
 |
| Click to zoom this Image |
10. You have now reached to a stage where you can now install Windows 10 on VMware Workstation 12 Pro. Please click on
Power on this virtual machine to start vmware installation.
 |
| Click to zoom this Image |
11. This is the Welcome screen of installation wizard.
 |
| Click to zoom this Image |
12. Please choose the type o platform that your hardware support to install Windows 10 on VMware Workstation 12 Pro.
 |
| Click to zoom this Image |
13. Once you choose the type of Windows platform and Enter the key, it will loads Windows 10 file to start setting up Windows 10.
 |
| Click to zoom this Image |
 |
| Click to zoom this Image |
14. This is the setup screen where it will ask you to choose
Language to install,
Time and currency format and
Keyboard and input method and then click on
Next button.
 |
| Click to zoom this Image |
15. Click on
Install Now.
 |
| Click to zoom this Image |
16. Windows 10 setup has been started now.
 |
| Click to zoom this Image |
17. Please Enter setup key if you have purchased Windows 10 or else you can click on
skip button.
 |
| Click to zoom this Image |
18. Please select the Type of Operating System that you want to install and click on
Next.
 |
| Click to zoom this Image |
19. Please select License Agreement and click on
Next to continue.
 |
| Click to zoom this Image |
20. Please click on
Custom: Install Windows only (advanced) as we are installing a fresh copy of Windows 10 on your virtual machine. Please click on
Next to continue.
 |
| Click to zoom this Image |
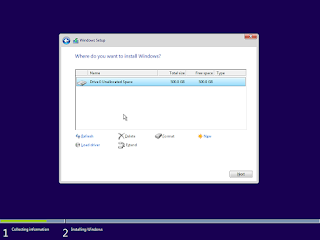
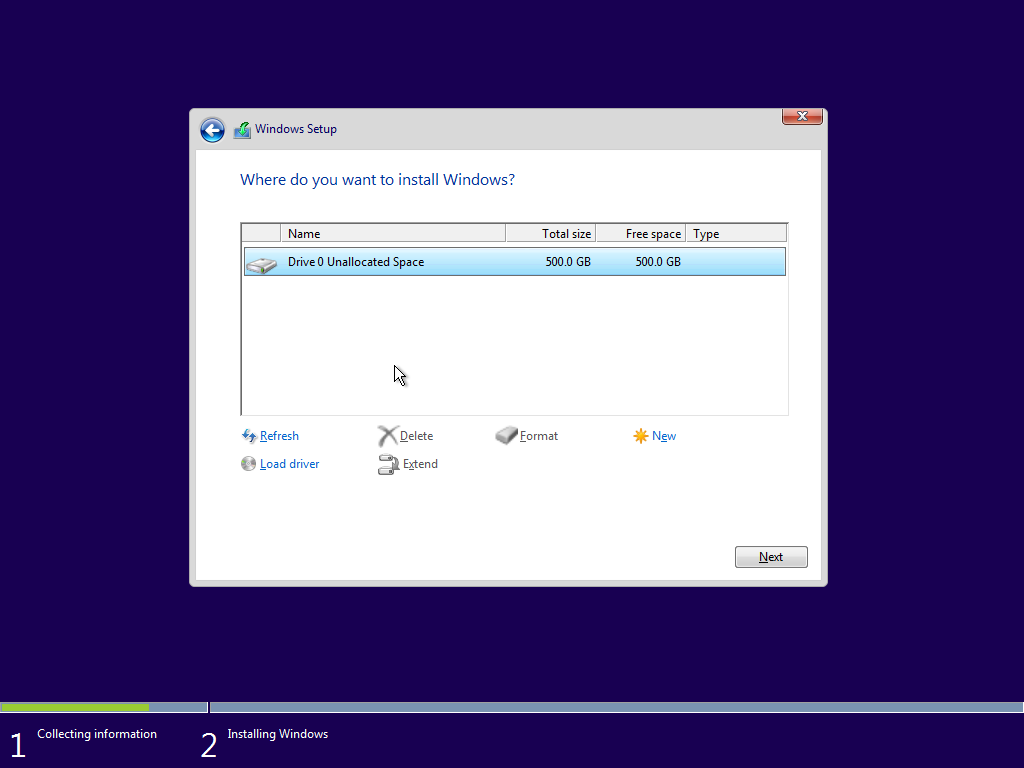
21. This is a virtual hard drive window. I chose 500 GB of virtual disk space for Windows 10 installation. Either you can install Windows 10 on 500 GB virtual space or you can customize your partition. To create a customize partition, please click on
New to create customize partition.
 |
| Click to zoom this Image |
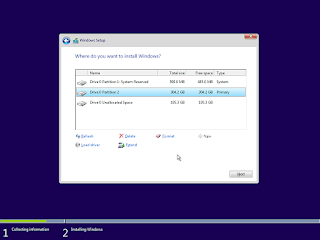
22. I have customize approx. 304 GB (Partition 2) virtual space where I want to install Windows 10. By Default Windows 10 will ask you reserve 500 MB (Partition 1) of reserved for system recovery. The rest un-allocated space is for the new partition where you cam store files, softwares or medias. This partition (Un-allocated Space) can be formatted now or cam be done later after Windows 10 installation. From Disk Management, you can create or format a new un-allocated partition.
 |
| Click to zoom this Image |
23. Now, Windows 10 has start installing. It will take 5 stages to complete its installation.
 |
| Click to zoom this Image |
24. Once Windows 10 completes its setup, it will get ready to start Windows 10 on your virtual machine.
 |
| Click to zoom this Image |
25. This screen will ask you to
Use Express settings as suggested by Microsoft or else you can
Customize Settings as per your choice. I chose
Customize Settings.
 |
| Click to zoom this Image |
 |
| Click to zoom this Image |
 |
| Click to zoom this Image |
26. Once you set
Customize Settings, Windows 10 will start setting apps for you to use and check for critical updates (if you VMWare Workstart is hooked with Internet).
 |
| Click to zoom this Image |
 |
| Click to zoom this Image |
 |
| Click to zoom this Image |
27. Choose
Local Active Directory domain to create an account for your PC.
 |
| Click to zoom this Image |
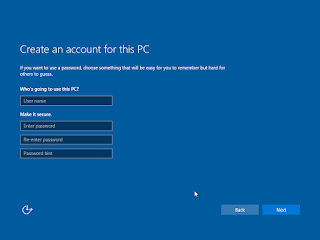
28. Please enter
username for Windows 10 account and setup
password to login.
 |
| Click to zoom this Image |
29. Once you are done, it will login to Windows 10.
 |
| Click to zoom this Image |
 |
| Click to zoom this Image |
30. Once you get in to Windows desktop screen, it will ask you how you if your PC to be discovered to your home or work network. You can select
Yes or
No as per your choice.
 |
| Click to zoom this Image |
31. This is a Desktop screen of your freshly installed Windows 10.
 |
| Click to zoom this Image |
32. If you want to adjust your virtual screen, then goto
Tabs of VMware Workstation 12 Pro menu and click on Install
VMWare Tools. Open DVD drive of Virtual Tools and run
setup to install VMWare Tools.
 |
| Click to zoom this Image |
33. Choose
Typical and
click on Next.
 |
| Click to zoom this Image |
34. Click
Install to to begin installation of VMware Tools.
 |
| Click to zoom this Image |
 |
| Click to zoom this Image |
 |
| Click to zoom this Image |
 |
| Click to zoom this Image |
35. Click Finish to close installation window of VMware Tools. Once it is done, VMware Tools will adjust the screen of Virtual Machine and you see its full view of Windows 10.
 |
| Click to zoom this Image |


Comments
Post a Comment